This is it, folks; we seem to have found the worst API for an “enterprise-grade” app, with horrible documentation to really bring it full circle.
This leads me to why I wrote the post, to provide a clear guide on what I wish I had known when I headed down this rabbit hole. Hopefully, others will find it helpful. A huge shoutout to Jacob Waters in MacAdmins for pointing me in the right direction. Appreciate ya, sir.
If you want to skip all this and grab my workflow, head here and tweak it as you need.
“Harrison, why do I need to do all this workflow stuff? Doesn’t Expensify have provisioning? They told me they did?”
Ah, but you would be mistaken.
The Okta integration cannot:
- Provision Users in Expensify
- Update User Attributes in Expensify
- Group Push from Okta to Expensify
- Import Groups from Expensify to Okta
“So building a workflow can’t be so bad, right?”
Oh you’re so wrong. Grab a coffee and pull up a chair.
Authentication
This is the most simple part. Navigate to the “integrations center” and grab a partnerUserID and partnerUserSecret. Store them somewhere safe. Yes, you have to hard-code them into your workflow; it’s very secure. 😒
Format
All requests go to the same endpoint, https://integrations.expensify.com/Integration-Server/ExpensifyIntegrations and must be wrapped in this requestJobDescription body.
Inside this requestJobDescription there are three values that you must set: type, credentials, inputSettings
Everything is a POST, but the type specifies the actual REST verb.
Putting it together and grabbing the policy IDs
Each policy has a corresponding ID we need to get to use downstream. Depending on your org, this could be quite simple, but in our case, we have multiple policies correlating to each geo, so I start by listing them all.
requestJobDescription={
        "type":"get",
        "credentials":{
            "partnerUserID": "XXX",
            "partnerUserSecret": "YYY"
        },
        "inputSettings":{
            "type":"policyList"
    }
}
If we go to the API documentation for Policy list getter, we will see that the only thing we have to specify is the type, which is inside inputSettings, which is inside requestJobDescription 🙃
I didn’t do this portion in OWF. I used Insomnia, which is my favorite API client. Since the values don’t change, I grab them and use an Assign card in the actual workflow. This section is more or less here as a primer to show you the weird format calls are structured in.
Time to Create a User
This workflow is a helper flow in my onboarding ecosystem, so we start by grabbing the userID upstream and using a Read card.
Next is the Lookup card, which translates our geos to the correct policy, and then an Assign card. Check it out below.

Just like the previous section, each API call is wrapped in a requestJobDescription, which must contain:
- type
- credentials
- dataSource
- inputSettings
The inputSetting doesn’t change; it’s included in every call. 😒
 "inputSettings": {
        "type": "employees",
        "entity": "generic"
 }
At the beginning of the workflow, I build the inputSetting with a Construct card, set it, and forget it.

And I do the same for the credentials.

Anddddd for the headers.

To summarize, at this point, we have the policyID, the credentials, inputSettings, and headers, which we can now freely call downstream.
One of the optional values we can pass is onFinish, just a weird way of saying a notification is sent at the end of the action. I use it to send an email to the manager. We can also build that here as well like such:
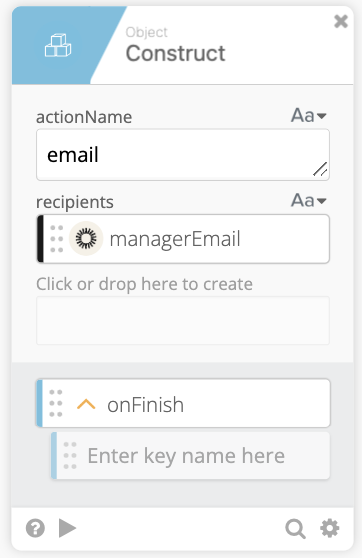
Now we can start to bring it all together!
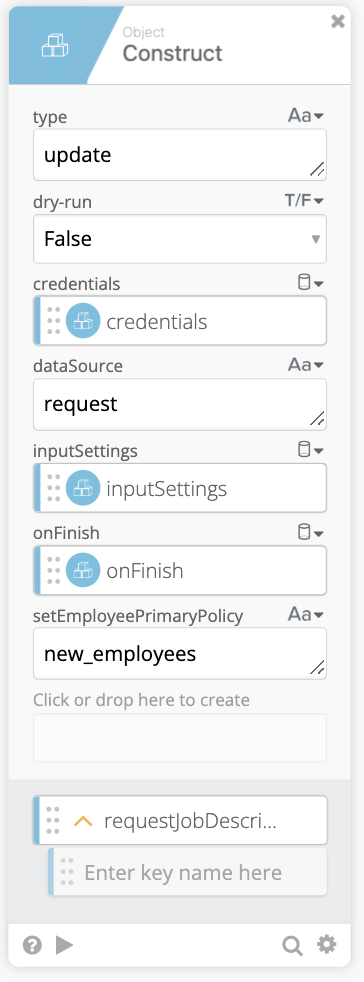
I’ll explain each part here quickly since it didn’t initially stick for me, either.
type is update, even though we are creating a user.
dry-run is True in prod. This can actually be helpful to review output.
credentials from key/value we created previously.
dataSource is request. Dunno why 🤷🏻♂️
inputSettings is that odd part that never changes.
onFinish is the email we will send to manager.
setEmployeePrimaryPolicy sets the policy as the primary.
We use a compose card to assign the variable, since it must be requestJobDescription=

And we haven’t even started the user attribute section yet 🥱
We should probably get to that point.
API needs the form in an array so we use a construct list card to build the individual user, then the object card to create the Employees and then finally assign it to data= variable. 😵💫 It’s like Russian nesting dolls.
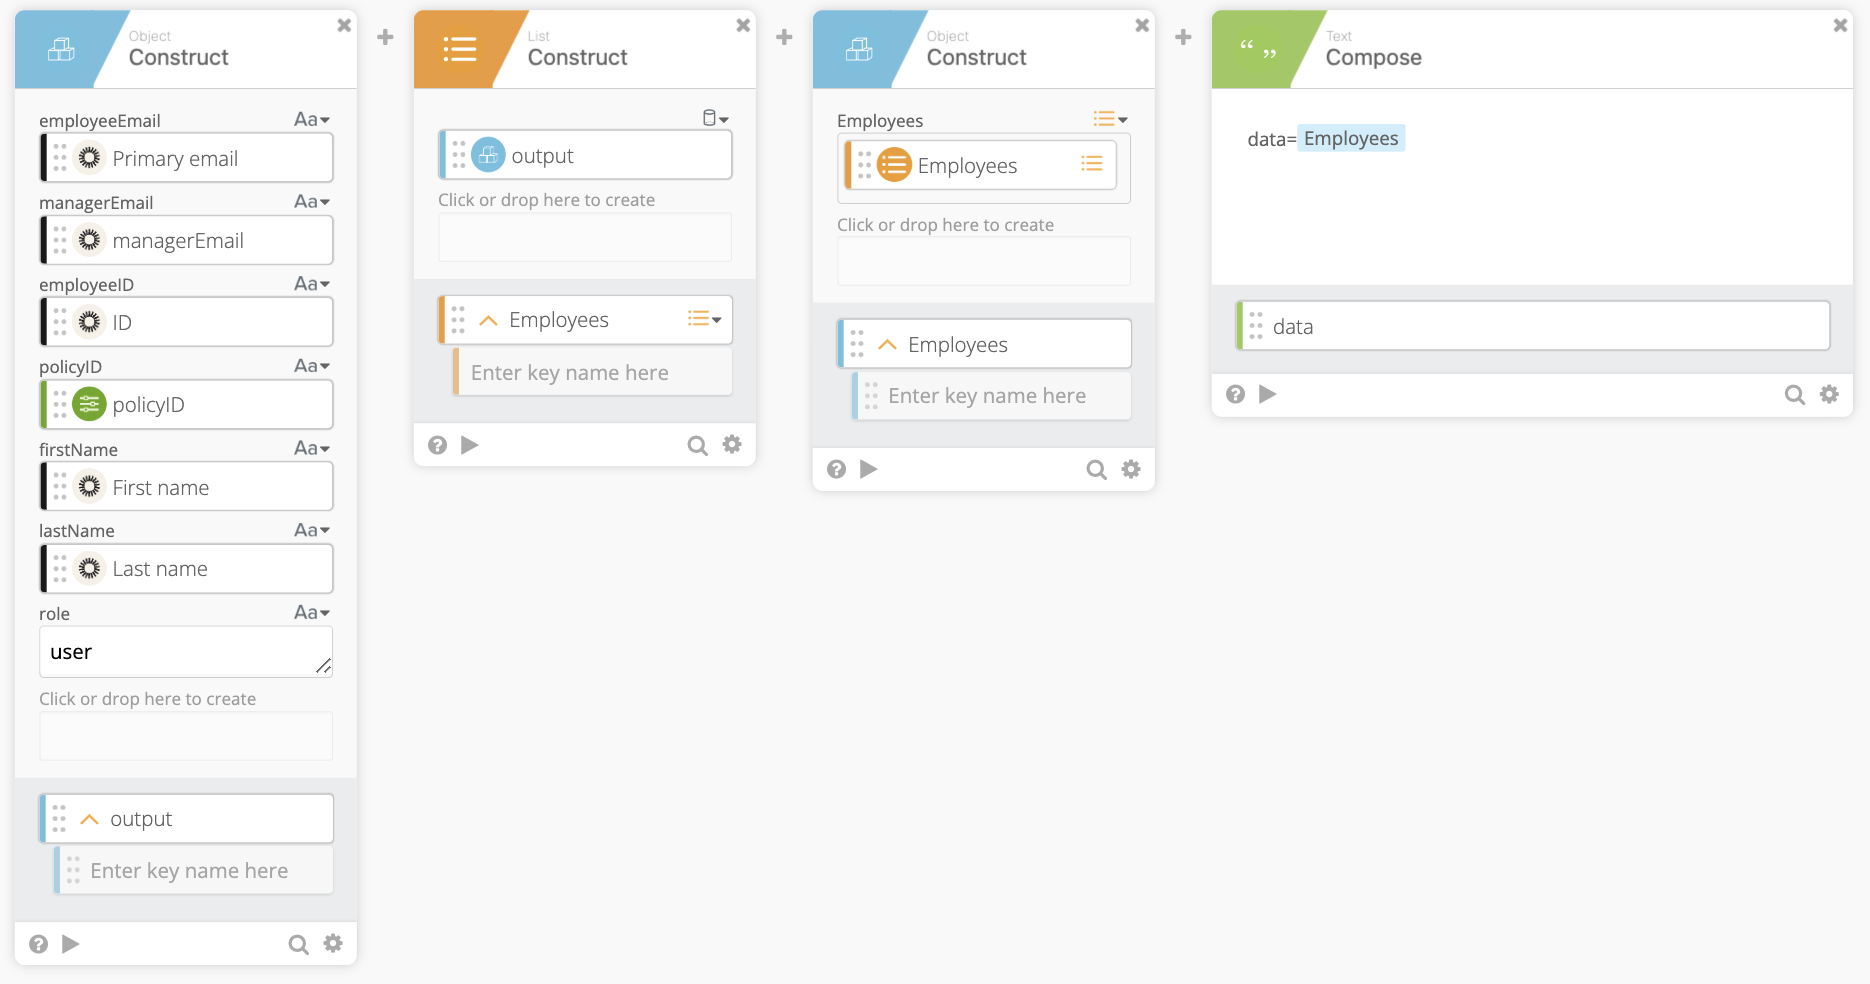
Finally! Bring it all together
Using an API card, we make a POST with the three sections we worked so hard to build previously.
requestJobDescription output gets dragged in. So do the headers and the data which is really the Employees array we built previously. All together it looks like:

Error Handling
As you can probably imagine, this part of the API isn’t a walk in the park, either. Expensify returns responseCode instead of statusCode. So we parse the returned JSON body in order to fetch the responseCode and determine if request was successful. If it fails, we have a message sent to Slack.